
Mastering Google Tag Manager (GTM) is an essential skill for anyone involved in digital marketing and web analytics. Whether you’re a seasoned marketer, a budding analyst, or a website owner, understanding how to effectively implement and manage tags through GTM can significantly enhance your data collection and analysis capabilities. This comprehensive guide will equip you with the knowledge and practical steps to use Google Tag Manager like a pro, unlocking its full potential to optimize your website’s performance and achieve your business objectives. We’ll cover everything from GTM setup and tag configuration to advanced techniques like custom variables and triggers, empowering you to make data-driven decisions.
This tutorial will delve into the intricacies of Google Tag Manager, providing a clear and concise roadmap to navigate its powerful features. Learn how to seamlessly integrate various marketing and analytics tags, including Google Analytics, Google Ads conversion tracking, and more. By the end of this article, you will be proficient in using GTM to streamline your tag management process, improve data accuracy, and gain valuable insights into user behavior. Unlock the power of data-driven decision making with this comprehensive guide to leveraging the full potential of Google Tag Manager.
What Is Google Tag Manager?
Google Tag Manager (GTM) is a free tag management system that allows you to quickly and easily update measurement codes and related code fragments collectively known as tags on your website or mobile app. This includes tags from Google products like Google Analytics and Google Ads conversion tracking, as well as third-party tags.
Instead of manually editing site code, GTM uses a web-based interface to manage and deploy tags. This simplifies the process and reduces the risk of errors. It gives marketers greater control and flexibility over their tracking and marketing efforts.
GTM works through a small snippet of code installed on your website. This code then facilitates the deployment of other tags configured within the GTM interface. No further code changes are typically needed on the site itself after the initial installation.
Installing GTM on Your Website
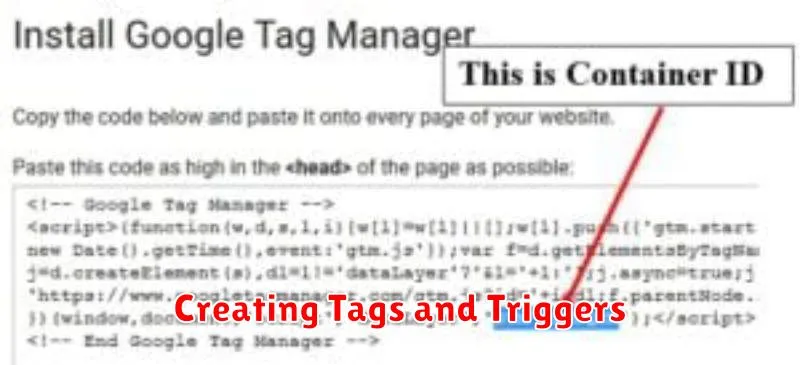
The first step to leveraging Google Tag Manager is installing its snippet on your website. This snippet is a small piece of JavaScript code that allows GTM to communicate with your site and manage your tags. This installation process is crucial and must be done correctly for GTM to function properly.
After creating your GTM account and container, you’ll receive two code snippets. The first snippet, containing the <script> tag, should be placed immediately after the opening <head> tag of every page on your website. The second snippet, containing the <noscript> tag, should be placed immediately after the opening <body> tag.
While the <script> version is ideal for most situations, the <noscript> snippet serves as a fallback for users who have JavaScript disabled in their browsers. Implementing both snippets ensures comprehensive tag coverage across various user configurations.
Creating Tags and Triggers
Tags and triggers are the core components of Google Tag Manager. A tag is a snippet of code that executes a specific action, such as tracking a page view or a conversion. A trigger determines when a tag should fire.
To create a tag, navigate to the “Tags” section and click “New”. Choose a tag type from the provided list (e.g., Google Analytics, Google Ads). Configure the tag with the necessary information, which will vary depending on the tag type. For instance, a Google Analytics page view tag requires a tracking ID.
Triggers are created similarly, under the “Triggers” section. Common trigger types include page views, clicks, form submissions, and custom events. Define the conditions that must be met for the trigger to activate. For example, a page view trigger might be configured to fire on all pages or only specific URLs. You can use variables to define more complex triggering conditions.
Once a tag and a trigger are created, link them together. Within the tag configuration, select the corresponding trigger from the “Triggering” section. This ensures that the tag will fire whenever the trigger’s conditions are met.
Tracking Events Without Coding
One of Google Tag Manager’s (GTM) most powerful features is its ability to track events without writing any code. This democratizes analytics, enabling marketers and analysts to gather valuable data about user interactions without relying on developers.
GTM’s built-in Auto-Event Variables automatically capture common interactions like clicks, form submissions, and link clicks. By configuring triggers based on these variables, you can easily track these actions as events in your analytics platform.
For example, you might want to track clicks on a specific button. Within GTM, you’d create a new trigger of the “Click – Just Links” or “Click – All Elements” type, depending on your specific use case. You would then specify conditions for the trigger, such as the button’s ID or class, to fire the tag only when that specific button is clicked. This setup then sends data to your analytics platform each time the specified interaction occurs.
This no-code approach allows for flexible and rapid event tracking implementation, freeing up developer resources and empowering non-technical users to gather valuable insights about user behavior.
Debugging with Preview Mode
Preview and Debug mode in Google Tag Manager is a crucial tool for verifying your tags are firing correctly before they go live. It allows you to see, in real-time, which tags are triggered, what data they’re collecting, and if any issues arise. This helps avoid costly mistakes and ensures accurate data collection.
To enable Preview mode, click the “Preview” button in the top right corner of the GTM interface. This will open a new window with your website, overlaid with the GTM debugger. As you navigate your site, the debugger will show the tags firing on each page.
The debugger is split into two main sections: Summary and Tags. The Summary tab provides an overview of all tag activity on the current page. The Tags tab displays detailed information for each individual tag, including the tag type, firing triggers, and data layer variables.
By utilizing Preview mode, you can identify and resolve issues such as incorrect triggers, missing data, or duplicate tags. This ensures that your tags function as expected, providing accurate and reliable data to your analytics platforms.
Integrating with Google Analytics
Google Tag Manager (GTM) simplifies the process of integrating Google Analytics into your website. It eliminates the need to manually add tracking code snippets directly into your site’s source code. Instead, you configure tags within GTM’s interface, making it much easier to manage and update your analytics implementation.
The key to this integration is the Google Analytics tag within GTM. This tag allows you to specify the tracking ID for your Google Analytics property, which essentially links GTM to your Analytics account.
Once configured, this tag will automatically send data to Google Analytics based on triggers you define. For instance, a common trigger is a “page view” trigger, which sends data to Analytics every time a page loads.
Beyond basic page view tracking, GTM allows for sophisticated event tracking. You can configure tags to track specific user interactions such as clicks, form submissions, video plays, and more. This provides granular insights into user behavior on your site.
Best Practices for Tag Management
Effective tag management is crucial for accurate data collection and analysis. Following best practices ensures data integrity and streamlines your workflow. Here are some key recommendations:
Planning and Documentation
Plan your tagging strategy before implementation. Clearly define your goals and the data you need to collect. Document everything thoroughly. This includes tag names, triggers, variables, and their intended purpose.
Folder Organization
Use folders to organize your tags, triggers, and variables within Google Tag Manager. This improves readability and simplifies maintenance, especially in complex setups.
Naming Conventions
Establish clear naming conventions. Consistent naming makes it easier to identify and manage your tags. For example, use prefixes to indicate tag types (e.g., “ga_” for Google Analytics tags).
Testing and Quality Assurance
Test your tags thoroughly before publishing them. Use the preview and debug mode in Google Tag Manager to verify that tags are firing correctly and data is being collected accurately. Regular quality assurance checks are also essential to maintain data integrity.